
Host Multiple applications on Windows Server: Same IP, Same Port Number, Different Host Name
In this article, we’ll show you how you can host multiple websites/applications on the same IIS server and bind them to the same port and IP. Each IIS website/application contains 3 values that make up a unique combination for it. These are: IP address, TCP port and Host header. To add a website/application on your server follow the steps below. For this example, we are adding one called TruehostTest
1. Make sure your application files are located in a folder called TruehostTest. Move this folder and it’s content to C:\inetpub
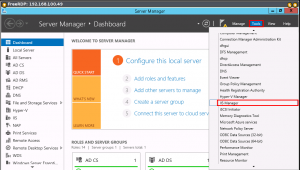
2. Access IIS Manager – Server Manager >>> Tools >>> IIS Manager
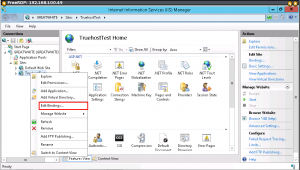
3. Once IIS Manager load, click the host name of the server and manoeuvre the cursor to Sites and right click to see Add Website. Click on Add Website

4. Once the dialogue box appears, fill in the details. For our case, we will fill in as follows. Don’t fill in the host name yet.

Once you fill in the details, you will get an error message stating that you can’t use port 80 as another site is using the same port. Agree to it by clicking Yes

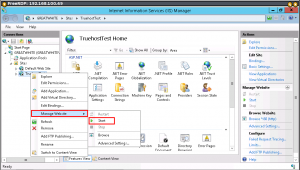
5. Now, we need to create another binding so that we can specify a different Host Name for the new site TruehostTest. Right click on TruehostTest and select Edit bindings…
6. Select on the binding you want and click Edit.

7. Add a Host name that users will use to access the Site. Here we add TruehostTest. Close the dialogue box.
8. Now, we start the website. To start it, go to TruehostTest>>>Manage Website>>>Start
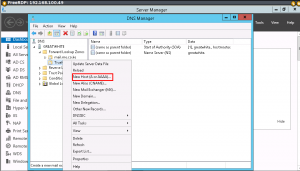
9. Now access the DNS Manager and add a CNAME or Host Name. To do this, go to Server Manager>>>Tools>>>DNS. This opens the DNS Manager. Expand the options in your ServerName (In my case, this is GREATWHITE(GREATWHITE)) and right click on Forward Lookup Zones. Then, click New Zone

10. A setup wizard will pop up and guide you on the what to fill. Fill in the following details as you press Next…
-
Zone type: Primary zone
-
Zone name: TruehostTest (use your site name)
-
Dynamic Update: Allow only secure dynamic updates
-
Press Finish
-
NB: For any part of the wizard with no details above, simply leave the default details filled in and press Next
11. Under DNS Manager, Right click on the website name and click New Host(A or AAAA). Add the IP address of the server under IP address then click Add Host.
Now, access your website/application by typing http://TruehostTest

Leave A Comment?