Domain SearchInstantly check and register your preferred domain name
 Web Hosting
 cPanel HostingHosting powered by cPanel (Most user friendly)
 KE Domains
 Reseller HostingStart your own hosting business without tech hustles
 Windows HostingOptimized for Windows-based applications and sites.
 Free Domain
 Affiliate ProgramEarn commissions by referring customers to our platforms
 Free HostingTest our SSD Hosting for free, for life (1GB storage)
 All DomainsBrowse and register domain extensions from around the world
 .Com Domain
 WhoisLook up domain ownership, expiry dates, and registrar information
 VPS Hosting
 Managed VPSNon techy? Opt for fully managed VPS server
 Dedicated ServersEnjoy unmatched power and control with your own physical server.
 SupportOur support guides cover everything you need to know about our services
A freshly provisioned VPS with password authentication enabled becomes a target almost immediately. Automated bots don’t need to pick you out specifically. They scan the entire internet, find open port 22, and start cycling through username and password combinations at machine speed. And it never stops.
This is why implementing SSH keys for Linux VPS security should be one of your first security tasks.
This guide does it in five steps.
In this case, SSH keys replace password-based authentication with a much stronger method, significantly reducing the risk of unauthorized access.
Passwords have three failure modes. They can be guessed. They can be leaked through phishing, credential reuse, or a breached database somewhere in your past. And they can be brute-forced by bots running round the clock.
SSH keys use asymmetric cryptography. You generate a key pair: a private key that stays on your machine and a public key that lives on the server. During login, the server verifies your identity without exposing the private key, making unauthorized access far more difficult.
For businesses running websites, applications, online stores, or APIs, a compromised server can result in downtime, data loss, and potential exposure of customer information.
Spending a few minutes setting up SSH keys can help prevent those costly security incidents later.
Before you begin, you’ll need:
- A running Linux VPS (Ubuntu 20.04+ or Debian is recommended)
- Existing SSH access with a password
- A local computer to generate your SSH keys.
Linux and macOS include a built-in terminal, while Windows users can use PowerShell or PuTTY. Using a non-root user with sudo privileges is also recommended for better security.
Steps for Implementing SSH Keys for Linux VPS Security
Step 1: Generate the SSH Key Pair on Your Local Machine
The first step is creating a cryptographically secure SSH key pair on your local computer. This key pair will be used to verify your identity when connecting to the VPS, eliminating the need for password-based logins.
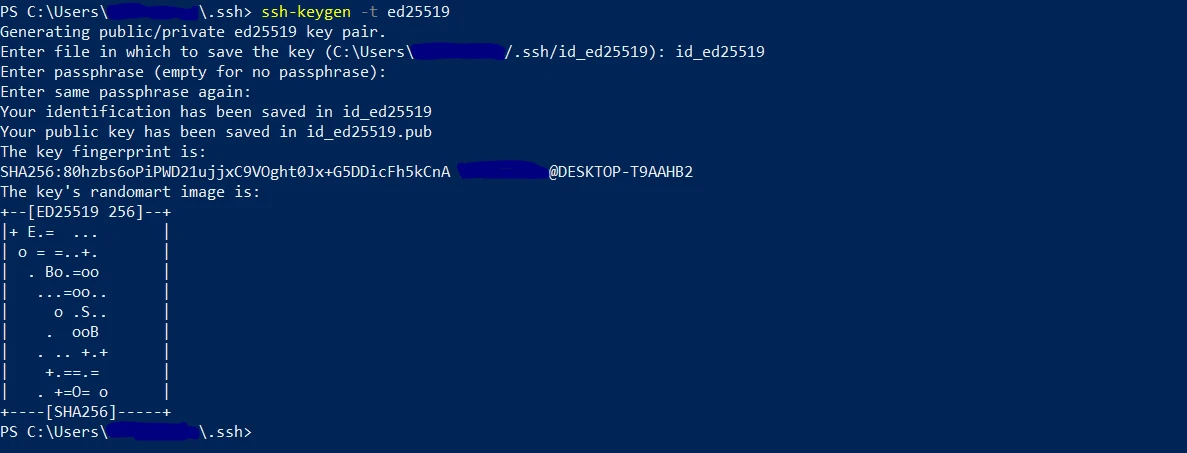
Linux / macOS
Run the following command in your terminal:
ssh-keygen -t ed25519 -C "[email protected]"When prompted, press “Enter” to use the default file location (~/.ssh/id_ed25519) or specify a custom filename if you want to create a dedicated key for this server.
You’ll also be asked to create a passphrase. While optional, adding a strong passphrase is highly recommended because it encrypts the private key stored on your device.
Once the process is complete, two files will be created:
id_ed25519– your private key. Keep it secure and never share it.id_ed25519.pub– your public key. This is the file you’ll add to your VPS.
Windows (PowerShell – Windows 10/11)
Open PowerShell and run:
ssh-keygen -t ed25519The setup process is similar to Linux and macOS. By default, the keys are stored in:
C:\Users\YourName\.ssh\Windows (PuTTYgen)
If you’re using PuTTY, open “PuTTYgen”, select “Ed25519” as the key type, and click “Generate”. After the key pair is created, save both the private and public keys.
You’ll also need to copy the public key text displayed in the application, as you’ll use it in the next step.
Why Ed25519?
Ed25519 is the recommended key type for modern systems because it offers stronger security and better performance than older RSA-based keys. It is supported by current Linux distributions and should be your default choice whenever available.
Step 2: Copy the Public Key to Your Linux VPS
Now it’s time to add your public key to the VPS. Once the key is in place, the server will recognize your device and allow secure key-based authentication.
Method A – Using ssh-copy-id (Linux/macOS)
This is the quickest and easiest option.
ssh-copy-id username@your_vps_ipReplace username with your VPS username and your_vps_ip with your server’s IP address.
You’ll be prompted to enter your VPS password one last time. After that, the tool automatically copies your public key to the server and adds it to the ~/.ssh/authorized_keys file with the correct configuration.
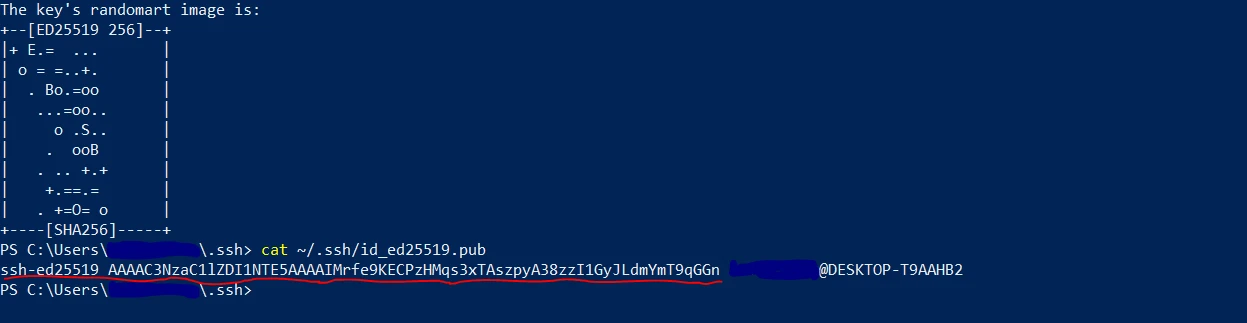
Method B – Manual Copy (Windows or if ssh-copy-id is unavailable)
Start by displaying your public key:
cat ~/.ssh/id_ed25519.pubCopy the entire output.
Next, log in to your VPS and run:
mkdir -p ~/.ssh
nano ~/.ssh/authorized_keys
Paste the public key on a new line, save the file, and exit the editor.
Then set the correct permissions:
chmod 700 ~/.ssh
chmod 600 ~/.ssh/authorized_keys
These permissions are important. Incorrect file permissions are one of the most common reasons SSH key authentication fails.
If your VPS was provisioned with a root password through our Truehost control panel, use root as the username during this step. Before disabling root login later, create a dedicated user account with sudo privileges as covered in Step 5.
Step 3: Test Your SSH Key Login
Before making any security changes, confirm that key-based login is actually working. This step prevents accidental lockouts later.
Open a new terminal window and keep your current session untouched. Then run:
ssh username@your_vps_ipIf the system asks for your passphrase, everything is set correctly and the key is working as expected.
If it still asks for a password, the key setup didn’t go through properly. Go back to Step 2 and check the contents of authorized_keys as well as file permissions before moving forward.
Do not proceed to the next step until this login test succeeds. Turning off password authentication while SSH keys are not functioning can lock you out of the server. On a Truehost VPS, It’s possible to recover through the control panel console, but avoiding that situation is far safer.
Step 4: Disable Password Authentication
Once SSH key login is confirmed, the next step is to remove password-based access so only key authentication is allowed.
Log into your VPS using the working SSH key session from Step 3 and open the SSH configuration file:
sudo nano /etc/ssh/sshd_configLocate the following settings. If they are missing, add them. If they are commented out with #, remove the symbol and update the values:
PasswordAuthentication no
PubkeyAuthentication yes
ChallengeResponseAuthentication no
Save the file using CTRL + O, press Enter, then exit with CTRL + X.
Restart the SSH service to apply changes:
sudo systemctl restart sshOn older systems, use:
sudo service ssh restartBefore closing your session, open a third terminal window and try logging in again. This confirms that access still works after disabling password authentication.
Troubleshooting
If you see Permission denied (publickey), the issue is often incorrect file permissions. Fix it with:
chmod 700 ~/.ssh && chmod 600 ~/.ssh/authorized_keysOn Ubuntu 22.04 and newer, SSH settings may be split across files inside /etc/ssh/sshd_config.d/. Files such as 50-cloud-init.conf can override your settings and re-enable password authentication, so it’s worth checking for conflicting entries there.
Step 5: Disable Root Login (Recommended)
The root account is the first place automated attacks try. It exists on every Linux server, which makes it predictable and heavily targeted. Turning off direct root login forces any attacker to guess a normal username first, adding a strong extra layer of protection.
Before making this change, confirm there is a working non-root user with SSH key access and sudo privileges. If you are still logging in as root only, create a new user first:
adduser yourusername
usermod -aG sudo yourusername
After creating the user, repeat Steps 2 to 4 for it. Confirm that it can log in via SSH keys and run sudo commands without issues.
Once that is in place, open the SSH configuration file again:
sudo nano /etc/ssh/sshd_configFind the line:
PermitRootLogin noIf it is missing, add it. If it is set differently, update it to no.
Save the file and restart SSH:
sudo systemctl restart sshBefore closing your current session, open a separate terminal and log in using the new user account. Confirm everything works as expected. Keeping one active session open while making SSH changes prevents accidental lockouts.
FAQs for Implementing SSH Keys for Linux VPS Security
How do you secure SSH access on a Linux server?
Set up SSH key authentication, disable password login, and turn off root access. Adding a firewall (UFW) and tools like fail2ban further strengthens security.
How do you access a VPS on Linux?
Use the command ssh username@your_vps_ip. With SSH keys configured, access is granted using your private key instead of a server password.
How do you start the SSH service on Linux?
sudo systemctl start ssh
sudo systemctl enable ssh
sudo systemctl status ssh
How do you remotely access a VPS?
SSH is the standard method. Linux and macOS users connect through the terminal, while Windows users can use PowerShell or PuTTY.
Which Linux distribution is best for a VPS?
Ubuntu LTS releases are widely used due to stability and strong community support. AlmaLinux is another solid option, especially for RHEL-based environments.
What is the best SSH key type to generate?
Ed25519 is recommended. It offers strong security and better performance than older RSA keys.
How do you find your SSH key on Linux?
SSH keys are stored in ~/.ssh/. Run:
ls ~/.ssh/The .pub file is your public key.
How do you copy an SSH key to a VPS?
On Linux/macOS:
ssh-copy-id username@your_vps_ipOn Windows, display the key using cat ~/.ssh/id_ed25519.pub and paste it into ~/.ssh/authorized_keys on the server.
Your Server Security Starts With the Right VPS Platform
SSH keys are one of the most effective upgrades you can apply to a Linux VPS, but they depend on having a reliable hosting environment that gives full control.
A secure configuration on a weak or restricted host still leaves gaps. A solid VPS gives you the flexibility to apply proper security from the start.
Truehost VPS hosting provides full root access, SSD storage, and Linux distributions like Ubuntu, AlmaLinux, and Oracle Linux, with plans starting from KES 1400/month and M-PESA payment support.
Available options include:
- Standard VPS Hosting – at KES 1775/month with full root access and SSD storage.
- Kenya VPS – locally hosted for lower latency on Kenyan traffic.
- Managed VPS – server management handled for you.
Security on a VPS is built step by step, and SSH keys are where that foundation begins.